基于esp8266的小爱同学和app控制的小台灯
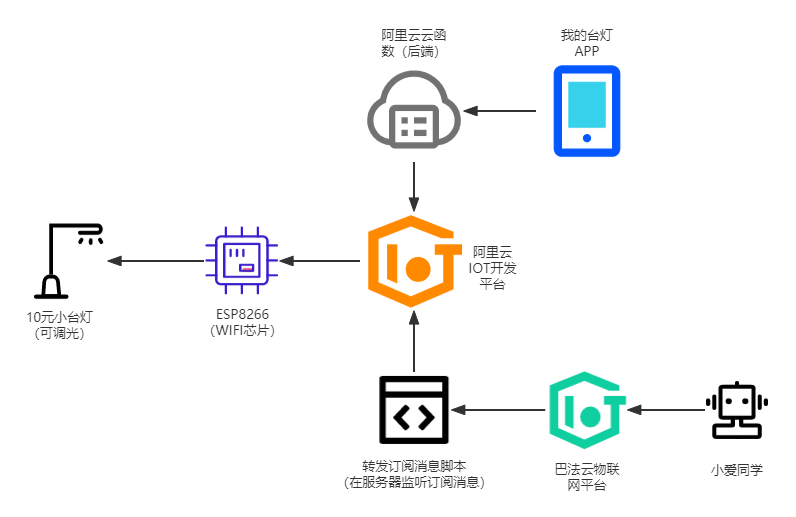
流程图
esp8266 代码
使用 arduino ide 烧录esp8266代码,如下。
// 引入 wifi 模块
#include <ESP8266WiFi.h>
static WiFiClient espClient;

// 引入阿里云 IoT SDK
#include <AliyunIoTSDK.h>

// 设置产品和设备的信息,从阿里云设备信息里查看
#define PRODUCT_KEY ""
#define DEVICE_NAME ""
#define DEVICE_SECRET ""
#define REGION_ID "cn-shanghai"

// 设置 wifi 信息
#define WIFI_SSID ""
#define WIFI_PASSWD ""

// 初始化 wifi 连接
void wifiInit(const char *ssid, const char *passphrase)
{
    WiFi.mode(WIFI_STA);
    WiFi.begin(ssid, passphrase);
    while (WiFi.status() != WL_CONNECTED)
    {
        delay(1000);
        Serial.println("WiFi not Connect");
    }
    Serial.println("Connected to AP");
}

// 属性修改的回调函数
void brightnessCallback(JsonVariant p)
{
    int brightness = p["table_lamp:brightness"];
      // 改变亮度
    if (brightness == 1)
    {
      switch_brightness();
    }
}

// 属性修改的回调函数
void lightingtoneCallback(JsonVariant p)
{
    int lightingtone = p["table_lamp:lightingtone"];
     // 改变色调
    if (lightingtone == 1)
    {
      switch_lightingtone();
    }
}

void setup() {
   Serial.begin(9600);
    // 初始化 wifi
    wifiInit(WIFI_SSID, WIFI_PASSWD);
    // 初始化 iot,需传入 wifi 的 client,和设备产品信息
    AliyunIoTSDK::begin(espClient, PRODUCT_KEY, DEVICE_NAME, DEVICE_SECRET, REGION_ID);
    // 绑定一个设备属性回调,当远程修改此属性,会触发 powerCallback
    AliyunIoTSDK::bindData("table_lamp:brightness", brightnessCallback);
        // 绑定一个设备属性回调,当远程修改此属性,会触发 powerCallback
    AliyunIoTSDK::bindData("table_lamp:lightingtone", lightingtoneCallback);
}

void loop() {
  AliyunIoTSDK::loop();
}

//改变亮度
void switch_brightness(){
  pinMode(LED_BUILTIN, HIGH);
  pinMode(16, HIGH);
  delay(100);
  pinMode(16, LOW);
  pinMode(LED_BUILTIN, LOW);
}

//改变灯光色调
void switch_lightingtone(){
  pinMode(LED_BUILTIN, HIGH);
  pinMode(16, HIGH);
  delay(1200);
  pinMode(16, LOW);
  pinMode(LED_BUILTIN, LOW);
}
阿里云IOT平台
完成实例、产品、设备注册。
配置物模型数据,相当于制作一个抽象的、数字化的台灯。通过这个物模型,控制实际设备。
模型TSL如下。
{
  "schema": "https://iotx-tsl.oss-ap-southeast-1.aliyuncs.com/schema.json",
  "profile": {
    "version": "1.0",
    "productKey": "gs6cY8aZKGQ"
  },
  "properties": [
    {
      "identifier": "brightness",
      "name": "亮度",
      "accessMode": "rw",
      "desc": "1为调节亮度",
      "required": false,
      "dataType": {
        "type": "bool",
        "specs": {
          "0": "关",
          "1": "开"
        }
      }
    },
    {
      "identifier": "lightingtone",
      "name": "色调",
      "accessMode": "rw",
      "desc": "1为调节色调",
      "required": false,
      "dataType": {
        "type": "bool",
        "specs": {
          "0": "关",
          "1": "开"
        }
      }
    }
  ],
  "events": [
    {
      "identifier": "post",
      "name": "post",
      "type": "info",
      "required": true,
      "desc": "属性上报",
      "method": "thing.event.property.post",
      "outputData": [
        {
          "identifier": "brightness",
          "name": "亮度",
          "dataType": {
            "type": "bool",
            "specs": {
              "0": "关",
              "1": "开"
            }
          }
        },
        {
          "identifier": "lightingtone",
          "name": "色调",
          "dataType": {
            "type": "bool",
            "specs": {
              "0": "关",
              "1": "开"
            }
          }
        }
      ]
    }
  ],
  "services": [
    {
      "identifier": "set",
      "name": "set",
      "required": true,
      "callType": "async",
      "desc": "属性设置",
      "method": "thing.service.property.set",
      "inputData": [
        {
          "identifier": "brightness",
          "name": "亮度",
          "dataType": {
            "type": "bool",
            "specs": {
              "0": "关",
              "1": "开"
            }
          }
        },
        {
          "identifier": "lightingtone",
          "name": "色调",
          "dataType": {
            "type": "bool",
            "specs": {
              "0": "关",
              "1": "开"
            }
          }
        }
      ],
      "outputData": []
    },
    {
      "identifier": "get",
      "name": "get",
      "required": true,
      "callType": "async",
      "desc": "属性获取",
      "method": "thing.service.property.get",
      "inputData": [
        "brightness",
        "lightingtone"
      ],
      "outputData": [
        {
          "identifier": "brightness",
          "name": "亮度",
          "dataType": {
            "type": "bool",
            "specs": {
              "0": "关",
              "1": "开"
            }
          }
        },
        {
          "identifier": "lightingtone",
          "name": "色调",
          "dataType": {
            "type": "bool",
            "specs": {
              "0": "关",
              "1": "开"
            }
          }
        }
      ]
    }
  ],
  "functionBlockId": "table_lamp",
  "functionBlockName": "台灯模块"
}
阿里云云函数
通过 Serverless 可以无服务器部署后端,方便快捷,关键还免费(小额使用)。
云函数代码如下。
'use strict';
exports.main = async (event, context) => {
    //event为客户端上传的参数
    console.log('event : ', event)
    const Core = require('@alicloud/pop-core');
    var client = new Core({
        accessKeyId: '',
        accessKeySecret: '',
        // securityToken: '<your-sts-token>', // use STS Token
        endpoint: 'https://iot.cn-shanghai.aliyuncs.com',
        apiVersion: '2018-01-20'
    });
    let b = 0;
    let l = 0;
    if(event["isBrightness"] == 1){
        b = 1;
        l = 0;
    }else{
        b = 0;
        l = 1;
    }

    var params = {
        "IotInstanceId": "iot-06z00g6fsqfbsgl",
        "ProductKey": "gs6cY8aZKGQ",
        "DeviceName": "light001",
        "Items": "{\"table_lamp:brightness\":"+b+",\"table_lamp:lightingtone\":"+l+"}"
    }

    var requestOption = {
        method: 'POST'
    };

    let res = client.request('SetDeviceProperty', params, requestOption).then((result) => {
        // console.log(JSON.stringify(result));
        return result;
    }, (ex) => {
        // console.log(ex);
        return ex;
    })
    return res;
};
我的台灯APP
APP基于vue,使用uni-app生成。
图示如下。
关键代码如下。
<template>
    <view class="bg">
        <view class="container">
            <view class="tittle">我的台灯▾</view>
            <view class="card-left">
                <uni-card title="灯光亮度" is-shadow=true>
                    <button class="icon-button" v-on:click="switchBrightness()">
                        <uni-icons type="loop" size="30"></uni-icons>
                    </button>
                </uni-card>
            </view>

            <view class="card-right">
                <uni-card title="灯光强度" is-shadow=true>
                    <button class="icon-button" v-on:click="switchLightingtone()">
                        <uni-icons type="loop" size="30"></uni-icons>
                    </button>
                </uni-card>
            </view>
        </view>
    </view>
</template>

<script>
    export default {
        onLoad: function() {
            console.log('index page load');
            // this.switch();
        },
        data() {
            return {
                isB: 1
            }
        },
        methods: {
            switch: function() {
                // callback方式
                uniCloud.callFunction({
                    name: 'switch',
                    data: {
                        "isBrightness": this.isB
                    },
                    success(res) {
                        let isSuccess = res.success;
                        console.log(res);
                    },
                    fail(err) {
                        console.log(err);
                    },
                });
            },
            switchBrightness:function(){
                this.isB = 1;
                this.switch();
            },
            switchLightingtone:function(){
                this.isB = 0;
                this.switch();
            }
        }
    }
</script>

<style>
    .bg {
        background: url(../../static/bg.jpg);
        background-size: cover;
        opacity: 1;
        z-index: -1;
        width: 100%;
        height: 100%;
        position: fixed;
    }

    .container {
        padding: 0 10px;
    }

    .tittle {
        font-size: 22px;
        padding-left: 15px;
        padding-bottom: 20px;
    }

    .card-left {
        width: 45%;
        float: left;
    }

    .card-right {
        width: 45%;
        float: right;
    }

    .icon-button {
        margin: 0;
        text-align: center;
    }
</style>
转发订阅消息脚本
因为我的手机是Redmi k30 pro, 所以想要接入小爱同学,但是小米的IOT开发者只支持企业入驻。所以只能借助巴法云物联网平台,然后使用脚本做消息转发来接入小爱同学。
脚本使用python编写,共有两个线程,子线程用来维持心跳。
import socket
import threading
import sys
import time
from urllib import parse

from alibabacloud_iot20180120.client import Client as Iot20180120Client
from alibabacloud_tea_openapi import models as open_api_models
from alibabacloud_iot20180120 import models as iot_20180120_models

# 心跳
class Heartbeat(threading.Thread):
    def __init__(self, s):
        super().__init__()
        self.s = s

    def run(self):
        while True:
            time.sleep(30)
            self.s.send("ping\r\n".encode())

def run():
    address = ('bemfa.com', 8344)  # 服务端地址和端口
    s = socket.socket(socket.AF_INET, socket.SOCK_STREAM)
    try:
        s.connect(address)  # 尝试连接服务端
    except Exception:
        print('[!] Server not found ot not open')
        sys.exit()
    s.send("cmd=1&uid=721a5***********************&topic=light002\r\n".encode())
    data = s.recv(1024)
    data = data.decode()
    print('[Recieved]', data)

    # 启动心跳子线程
    heartbeat = Heartbeat(s)
    heartbeat.start()

    while True:
        data = s.recv(1024)
        data = data.decode()
        data = data.replace("\r\n", "")
        data_dict = parse.parse_qs(data)
        # print('[Recieved]', data_dict)
        try:
            msg = data_dict["msg"]
            if msg[0] == "on":
                AliyunIOT.main(1, 0)
            if msg[0] == "off":
                AliyunIOT.main(1, 0)
        except Exception:
            pass
        # data
    # s.close()

class AliyunIOT:
    def __init__(self):
        pass

    @staticmethod
    def create_client():
        """
        使用AK&SK初始化账号Client
        @param access_key_id:
        @param access_key_secret:
        @return: Client
        @throws Exception
        """
        config = open_api_models.Config(
            # 您的AccessKey ID,
            access_key_id="",
            # 您的AccessKey Secret,
            access_key_secret=""
        )
        # 访问的域名
        config.endpoint = f'iot.cn-shanghai.aliyuncs.com'
        return Iot20180120Client(config)

    @staticmethod
    def main(b, l):
        client = AliyunIOT.create_client()
        set_device_property_request = iot_20180120_models.SetDevicePropertyRequest(
            product_key='',
            device_name='',
            iot_instance_id='iot-06z00g6fsqfbsgl',
            items="{\"table_lamp:brightness\":" + str(b) + ",\"table_lamp:lightingtone\":" + str(l) + "}"
        )
        res = client.set_device_property(set_device_property_request)
        # print(res)

if __name__ == '__main__':
    run()
巴法云物联网平台
- 新建TCP创客云主题,如下。
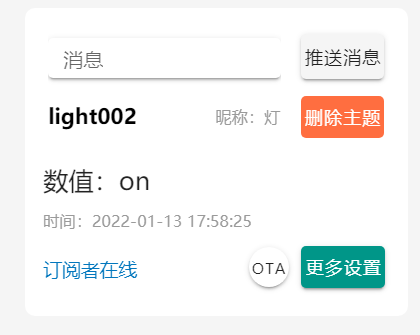
命名要求:
当主题名字后三位是001时为插座设备。
当主题名字后三位是002时为灯泡设备。
当主题名字后三位是003时为风扇设备。
当主题名字后三位是004时为传感器设备。
当主题名字后三位是005时为空调设备。
当主题名字后三位是006时为开关设备。
当主题名字后三位是009时为窗帘设备。
小爱同学绑定巴法云
绑定步骤。
打开米家-->我的-->其他平台设备-->巴法云-->绑定账户。


空空如也!